
I have been working on an application that collects market data in Eve Online via the ESI (Eve Swagger Interface) API. Most of this data is readily available using a combination of Eve Static Data (for region-, constellation-, and solar system information) and buy/sell orders from the /markets/{region_id}/orders/ endpoint. However, more and more player-owned structures are popping up near market hubs, with the intent of generating sales-tax revenue for an alliance rather than the isk going into NPC coffers. While I agree with this approach in-game, this presents a challenge because the endpoints to collect data about buy/sell orders in player structure markets (like universe/structures/ and /markets/structures/) require authentication using an active account’s credentials in order to proceed.
There are plenty of code snippets out there on how to access Eve Online’s ESI, and a couple of high-level walkthroughs, but most are for Python and all assume a linux box. Since I was using PHP on Windows box, I had to do a lot of this on my own. I’ve decided to lay out how to perform this in DOS (Part I) and PHP for Windows (Part II) to help the next person searching for this kind of solution.
The steps for getting an access token via a DOS command line go like this:
- Register new application in Eve as a third party developer
- Create authorization link to generate authorization code
- Use authorization code to generate access token and refresh token
- Use Refresh Token to create an auto regenerating access token
- Use regenerated access token to access ESI
I first attempted to do this with curl.exe (found here) in a CMD window because I wanted to get the workflow right before I created code to do it automatically, so I’ll start with that method, before laying out the code I wrote in PHP.
The manual DOS method
- Register Application with Eve
A new application needs to be created to establish permissions will be granted within the ESI API. By creating a new application and selecting the required permissions (more about that in a sec), you will receive a Client ID and a Secret ID that you will use to generate the access token that will allow authenticated API calls to ESI.
A. head over to https://developers.eveonline.com/ and log in with an Eve account in good standing, then click on Manage Applications
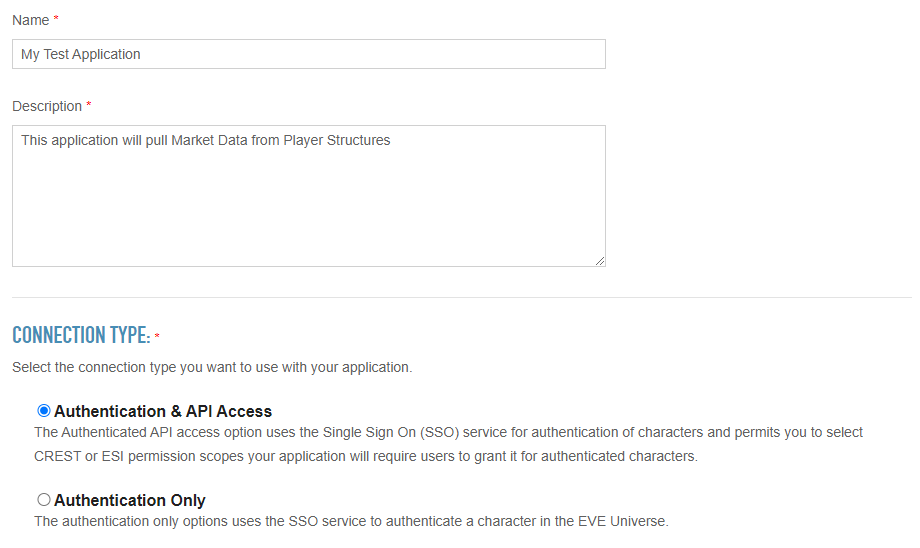
B. Click on create new application

C. Enter a name and description for your application. You will also select Authentication and API access, since you will be using this application’s credentials to access the ESI API
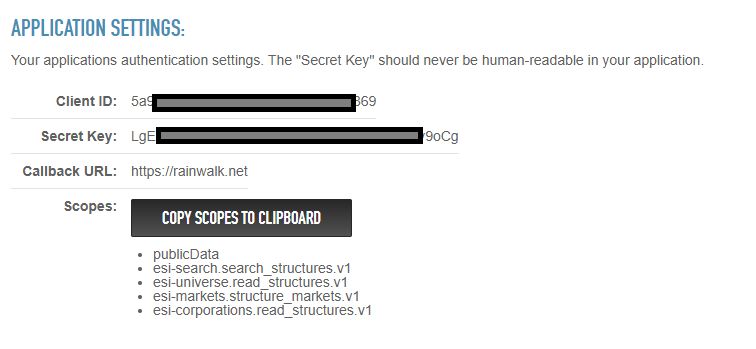
D. Set permissions for this application. I chose the following to allow, among other things, the listing and searching of structure details:
publicData
esi-search.search_structures.v1
esi-universe.read_structures.v1
esi-markets.structure_markets.v1
esi-corporations.read_structures.v1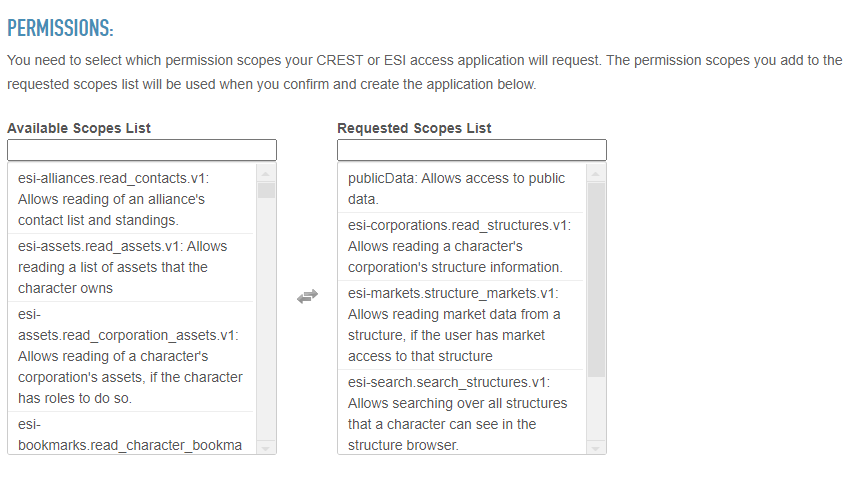
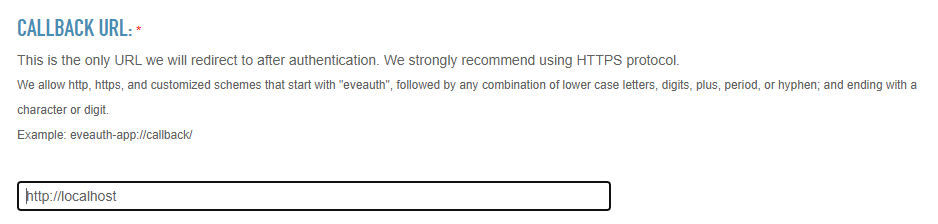
E. Specify the callback url. The callback url will be the destination web page that someone will be redirected to once they’ve successfully logged in to the authorization link. The callback url will have the authorization code appended to it upon successful authorization. You will be copy/pasting the authorization code in step 4.
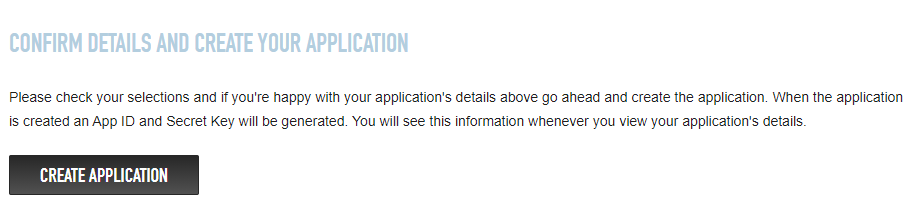
F. Click create application and your application will be created, generating the Client ID and Secret ID used in later steps.
G. Once the application is created you will be directed to a page with the clientID and SecretID hashes listed. It will also contain a list of the scope access permitted by this application.
- Create Authorization link
A. I literally created an internet shortcut (Right-Click -> New -> Shortcut) and pasted in the following:
https://login.eveonline.com/v2/oauth/authorize?response_type=code&redirect_uri=https://rainwalk.net&client_id=xxxxxxxxxxxxxxxxx&scope=publicData+esi-search.search_structures.v1+esi-universe.read_structures.v1+esi-markets.structure_markets.v1+esi-corporations.read_structures.v1&secret=xxxxxxxxxxxxxxxxxxx&state=abcdefAdd in the callback url specified in step 1F and specify the ClientID and Secret that were generated for the application. I also specified all of the scopes allowed by the application, separated by a plus sign. I’m still not sure what the “state” option does, but the command wouldn’t run without it. I picked five characters at random.
B. entering the above url into a web browser produces a redirect to the specified callback url, plus some additional information after it:
https://rainwalk.net/?code=xxxxxxxxxxxxxxxxxxxxxxxx&state=abcdefgThe string of characters after “code=” (here redacted to xxxxxx) is the authorization code. There is a tag called “state=” that I’m not sure what it does. I didn’t find any information on it, but the command fails without it. I picked a string of characters for it (‘abcdefg’) and it doesn’t appear anywhere else in this workflow.
- Use Authorization Code to generate Access Token and Refresh Token
I execute the following command, using my ClientID and Secret from my Application, plus the authorization code copy/pasted from the callback url:
curl -XPOST -H "Content-Type:application/json" -H "Authorization:Basic NWE5YWxxxxxxxMDk2ZjE5NTExxxxxxxjk6TGdFQ2VKSzUxxxxxxxFWUZjTGUwMHU0dDFJb1ZSMjl5OW9DZw==" -d "{\"grant_type\":\"authorization_code\", \"code\":\"xxxxxxxxxxxxxxxxxxx\"}" https://login.eveonline.com/v2/oauth/tokenThe string after “Authorization: Basic” header tag is a 64 bit encrypted hash of the clientID and Secret separated with a colon with no spaces: “ClientID:Secret”. I used https://www.base64encode.org/ to quickly create this hash.

The command will return a JSON record containing an access token and a refresh token. The access token allows you to authenticate to and access ESI and is valid for approximately 20 minutes. The refresh token is the token that allows you to refresh the access token /before it expires/ without going through all of the previous steps. The access token changes after every refresh, but the refresh token stays the same.
- Use Refresh Token to create a new access token
curl -XPOST --header "Accept: application/json" -H "Content-Type:application/x-www-form-urlencoded" -H "Authorization:Basic NWE5YWxxxxxxxMDk2ZjE5NTExxxxxxxjk6TGdFQ2VKSzUxxxxxxxFWUZjTGUwMHU0xxxxxxxxxxxxx9DZw==" -d "grant_type=refresh_token&refresh_token=xxxxxxxxxxxxxxxxxxxx" https://login.eveonline.com/v2/oauth/token
- Use regenerated access token to access ESI
This is an unauthenticated command to get all player structures available to the public with a public market
curl -X GET "https://esi.evetech.net/latest/universe/structures/?datasource=tranquility&filter=market" -H "accept: application/json" -H "Cache-Control: no-cache"
This command pulls all market data into a json file for structure ID 1029036975486
curl -X GET "https://esi.evetech.net/latest/markets/structures/1029036975486/?datasource=tranquility&page=1&token=eyJhbGciOiJSUzI1NiIsImtpZCI6IkpXVC1TaWduYXR1cmUtS2V5IiwidHlwIjoiSldUIn0.eyJzxxxxxxxxxxxxxxxxxxxxxxxxxxxxxxxxxxxxxxxxxxxxxxxxsImp0aSI6IjhlZWQwOTZkLWIyZGMtNDExNi05NDhxxxxxxxxxxxxxxxxxxxxxxxxxxxxxxxxxxxxxxxxxxxxxxxxxxUtS2V5Iiwic3ViIjoiQ0hBUkFDVEVSOkVWRToyNxxxxxxxxxxxxxxxxxxxxxxxxxxxxxxxxxxxxxxxxxxxxx1MTJkZGUzYTg2OSIsInRlbmFudCI6InRyYW5xdWlsaXR5IiwidGllciI6ImxpdmUiLCJyZWdpb24iOiJ3b3JsZCIsIm5hbWUiOiJBZ3Jpa2siLCJvd25lciI6IkUxS1V6dFIzUUgyVGxUbE8vaDBLYm1FL2s2Zz0iLCJleHAiOjE2MjE2NjQzMzEsImlzcyI6ImxvZ2luLmV2ZW9ubGluZS5jb20ifQ.D4-u56HhgGUtqQfSkJdDZpyeBK-iy5cvP-7if5gR3-XeaJbgcs8NKMeXwKFQ9fHAk83ISBa32P22n5QEhsUCoZ-iOgwbDlp_rjuUd9DSzK-UHTHqe2YggZTh4jVTLiuFR1ntvDWpwVQCOvkPykRca9Aa_nA92qUvqGQPso3yDuCg5DG30BpHuoDnR691i93WlYrKJPjQjnsWLXps3-CDGEMLrTTH0WH84JUoHR123BcBRwzHcpPc-udWSdEzuTZMrERiFHKF8pguOorhlwSm4ns2SvpV5F7r9cjGaZxFHgWVR5k2idV8y78oJ3lNDtmrRYaBlGn1C333LbCMzORxVw" -H "accept: application/json" -H "Cache-Control: no-cache"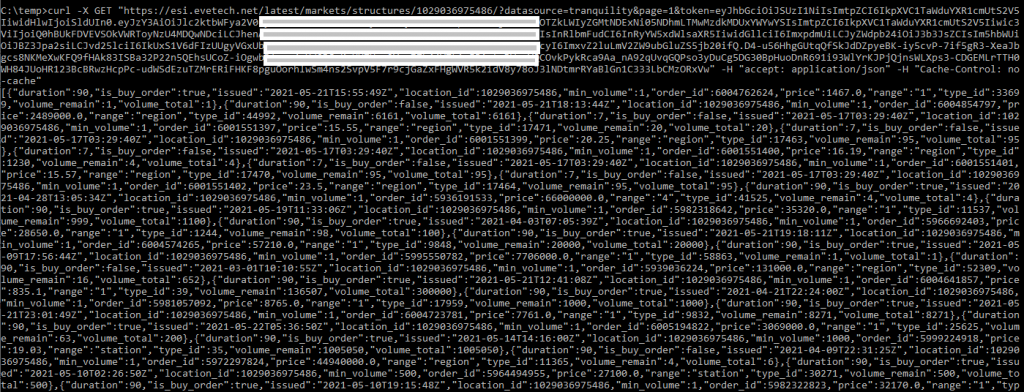
This command pulls information about Tranquility Production Center (structureID 1029036975486 – )
curl -X GET "https://esi.evetech.net/latest/universe/structures/1029036975486/?datasource=tranquility" -H "accept: application/json" -H "authorization: Bearer eyJhbGciOiJSUzI1NiIsImtpZCI6IkpXxxxxxxxxxxxxxxxxxxxxxxxxxxxxxxxiSldUIn0.eyJzY3AiOlsiZXNpLXNlYXJjaC5zZWFyY2hfc3RydWN0dXJlcy5xxxxxxxxxxxxxxxxxxxxxxxxxxxxxxxN0cnVjdHVyZXMudjEiLCJlc2ktbWFya2V0cy5zdHJ1Y3R1cmVfbWFya2V0xxxxxxxxxxxxxxxxxxxxxxxxxxxxxxxcmVhZF9zdHJ1Y3R1cmVzLnYxIl0sImp0aSI6ImU3MGQzODU2LWY1YjExxxxxxxxxxxxxxxxxxxxxxxxxxxxxxxCI6IkpXVC1TaWduYXR1cmUtS2V5Iiwic3ViIjoiQ0hBUkFDVEVSOkVWRToyNxxxxxxxxxxxxxxxxxxxxxxxxxxxxxxxODg0OGQ0YjE4NzQ2MmFjM2I5NzY3NyIsInRlbmFudCI6InRyYW5xdWlsaXxxxxxxxxxxxxxxxxxxxxxxxxxxxxxxxJ3b3JsZCIsIm5hbWUiOiJBZ3Jpa2siLCJvd25lciI6IkUxS1V6dFIzUUgyVGxUbE8vaDBLYm1FL2s2Zz0iLCJleHAiOjE2MjE2NjUwMTIsImlzcyI6ImxvZ2luLmV2ZW9ubGluZS5jb20ifQ.INo18NbUFHhDuRXVX-opJ9OjGpJyEIYKUJanDkN1YiX1eDVVu9St78Y21oOy_Hnml-KEhwKSyWZWi74SnFUpn2AqpGVQCwjhlWpJg56lpQecYhQntTlMQpS8X8GUu4fLr4CIxr8AHE6t8lPUbRirwn4TjKsU89C5Rch-Yj3Fu3iFOR6mkcYsGJ3nmsRspreG_LqpWOLoGMLY-RjXRrmkXL-PhcH1DAqzFUIWdk9LG8SdSc9K7QTS2yHu9UPVFKLr2u73dxuaubKqmOmpXOXJTmFueq4MZfcjor1LmDVBMjDX1nbyXsyQ9FnbFIGMHNzH0YrhvRCc3scbBGGuexmmfA" -H "Cache-Control: no-cache"
Hopefully you DOS users who want to try your hand at using ESI will find this handy.
Part II will detail how to do this exact process in PHP.
Pingback: How to access API endpoints from Eve Online’s Eve Swagger Interface requiring authentication using PHP – part II – Rainwalk